Showing posts with label easy. Show all posts

Saturday, 22 March 2014

Garbanzo Bravas (chickpeas in spicy tomato sauce)


Perhaps inspired by spending a couple of hours in the company of a Spaniard earlier today, I had a bit of a craving for patatas bravas when it came to lunchtime. I was really hungry though, and needed something NOW! Patatas bravas seemed like it would take too long, especially since I had no potatoes, so I decided to create a patatas bravas-inspired lunch: I named it 'garbanzo bravas'. I didn't know the Spanish for chickpeas, but as soon as I saw it, I realised that (unsurprisingly, perhaps) the American English word for chickpeas, garbanzo beans, actually comes from the Spanish. I love how exotic my new dish sounds!

I actually had some leftover homemade tomato sauce from the other night, so the recipe below is a little different to how I made it today, but should give you just the same result. This is quick, easy, and filling - and it makes a nice snack lunch or a side at dinner, or could even be part of a nice salad. Or of course, if you're serving tapas, this could be one of them!

Garbanzo Bravas (chickpeas in spicy tomato sauce)

(serves two)

Ingredients

a little oil
1/2 onion, finely chopped
3 cloves of garlic
1 tsp crushed red pepper flakes
a pinch of salt
1 tin chopped tomatoes
1 tin chickpeas, drained
1 tsp smoked paprika

Method

Heat a little oil in a pan over medium heat and add the onion. Cook for 5 minutes, or until softened, and add the garlic, salt and red pepper flakes. Stir and cook for a further minute - do not let the garlic brown. Add the tomatoes and bring to the boil, then reduce to a simmer and leave to simmer for 5 minutes.

Meanwhile, add a little oil to another pan over a medium heat, and then add the chickpeas and smoked paprika. Cook, stirring, for a couple of minutes until the chickpeas are heated through. Once the tomato sauce is ready, add the tomato sauce to the chickpea pan, and stir together. 

This could also be served on a bed of cous cous to make it a little bit more substantial, if desired.


As well as being really easy and tasty, I really love that this dish incorporates one of my favourite ingredients - smoked paprika. This is my favourite spice ever, as it just adds so much character and flavour to anything you add it to. I'm always looking for new ways to use it.

I hope you enjoy my recipe, and please let me know if you have any other ideas for how I can use smoked paprika in my cooking; I'd love to be inspired!


Friday, 29 November 2013

Easy Peasy Tortilla and Hummous Pizza


I love homemade pizza. Or rather, I love the idea of homemade pizza. But over the years, although I have had some success stories, I feel that I have spent too many pizza-making evening toiling away over a dough that ends up a bit too sticky or just not quite delicious enough, and subsequently the yummy toppings were always just slightly let down by the base. And not only did store-bought bases feel like cheating, they were also bland. So imagine my delight when I stumbled upon Dreena's homemade pizza, which uses a tortilla wrap for the base - ideal! A little bit creative (store-bought tortillas don't feel so much like cheating!), nice and simple, and best of all, TASTY! This is the homemade pizza I have been waiting for.

And so I decided to share my take on this fun Friday treat with you. As Dreena's original recipe is in fact vegan, you could certainly leave out the cheese to make this vegan-friendly - but I love cheese, so had to include it! I didn't half my cherry tomatoes, but that led to some less-than-fun explosions of burning hot tomato juice when I was eating, so I have suggested halving them in my method below. You can adapt this recipe to include any other toppings you choose - perhaps red onion, olives, or sweetcorn would also be nice. Mix it up a little and try your own toppings! Because that's the beauty of homemade pizza - it can be made exactly how you like it. What are your winning combinations for pizza toppings?

Tortilla and Hummous Pizza

Ingredients:

2 tortilla wraps
1 red pepper, sliced
approx. 5 small mushrooms, sliced
approx. 5 cherry tomatoes, halved
4 tbsps hummous
a little Cheddar cheese, grated

Method:

Pre-heat the oven to 200ºC. Put the chopped pepper, mushrooms and tomatoes in a roasting tin and roast in the oven for 15 minutes. On a separate oven tray, place the tortillas, and bake for 5-10 minutes (checking frequently to ensure they do not burn!). Remove the tortillas from the oven and leave to cool while the vegetables continue to roast. When the vegetables are done, remove from the oven. Spread the hummous over the tortillas (putting only a thin layer in the middle, to ensure it does not get soggy, and more towards the outside). Spread the vegetables evenly over the hummous, and finally, sprinkle with the grated cheese. Pop the pizzas in the oven for 5-10 minutes, until the cheese has melted and the hummous has 'cooked in' to the base a little.

Sunday, 10 November 2013

Treats from My Home Bakery and a Lovely Rice Salad


Sunday tends to be our shopping day, but today we felt like a wee treat after getting in the shopping and so we went to a lovely little local bakery in search of cakes. The bakery in question was My Home Bakery on Hyndland Street, and so tempting were its wares, that we we left the shop with not only two cakes, but also a savoury pastry each for our lunch. If you are in the west end of Glasgow, you should definitely pop in to this lovely little shop sometime, as it really is special. Service is always with a smile, and there are samples of various cakes if you can't decide just by looking at them which you would like to try. As their food not only tastes wonderful but also looks perfectly put together, I've included a selection of photos for you to drool over at the end of the post - and one just below, to whet your appetite!

A selection of the cakes on offer at My Home Bakery

After lunch, I decided to recreate a (slightly) less healthy version of a salad I saw featured on another local blogger's site yesterday: a rice salad from What Kate Made Next. I thought this looked nice - simple, healthy (though I switched the brown rice for white...), and a nice lunch to take into work with me. But I was amazed by just how great this salad is. Totally moreish, I couldn't stop myself from taking cheeky spoonfuls from it as I was preparing tonight's dinner! So I thought I would share this (ever so slightly modified) version of the recipe with you.


Spinach and Rice Salad

(makes enough for 4 lunchbox portions)

Ingredients:

250g long-grain rice
1/2 red onion
1 medium apple
100g baby spinach
80g raisins
2 tbsps olive oil
2 tbsps balsamic vinegar

Method:

Wash the rice and strain through a sieve. Put the washed rice in a pan and add 600 ml of water. Bring to the boil, then simmer until the water has all been absorbed and the rice is cooked through. Take off the heat and leave to cool. Meanwhile, chop the onion and apply into tiny pieces. When the rice has cooled, put into a bowl and mix in the onion, apple, spinach and raisins. Add the oil and vinegar and mix well. 

So simple, so delicious! I can't wait until lunchtime tomorrow to eat a full portion of this!

And now for the photos of our treats from My Home Bakery, as promised:

My spicy bean 'sausage' roll
The non-veggie version - pork sausage roll

Raspberry crumble - so sweet and delicious!


Chocolate orange cake - with orange rind through it. Yum. And it's gluten free.


Monday, 4 November 2013

Lentil 'Meatballs' and Tomato Sauce


I love taking inspiration from other food blogs - in terms of both style and content. I have already mentioned one of my favourite blogs, The Stone Soup on here - not only is Jules very knowledgeable about her subject, but she has a great style that I love reading. Plus all of her recipes come with tweaks, so even when she blogs about a meat or fish-based dish, she gives pointers on how to make it vegetarian or vegan. Her recipes are also nice and simple, which is always a plus! But another thing I love about her blog is how interactive it is - lots of readers always comment on her recipes, and - perhaps following her lead - are always keen to share how they have tweaked the recipe to suit their own needs or tastes. The end result is an amazing melting pot of culinary ideas based around a common dish, which I find so inspirational.


Last night's dinner was an amalgamation of one of Jules's recipes and one of Heidi Swanson's. Jules had blogged about lentil balls as an alternative to meatballs, and one of the commenters mentioned that they had made Heidi's Five-Minute Tomato Sauce to accompany the lentil balls. The sauce sounded so amazing that I just had to try both it and the lentil balls (that I keep accidentally referring to as meatballs....slips off the tongue more easily, doesn't it?!) and I was really impressed with both and just had to share this recipe with you. (David really enjoyed it too, so it has also passed the 'meat-eater test'.)

Lentil 'Meatballs' and Tomato Sauce

(Serves 2)

Ingredients:

115g dried brown lentils
500ml vegetable stock
3 tbsps olive oil (plus more for drizzling)
1 1/2 teaspoons crushed red pepper flakes
1/2 tsp salt
3 cloves garlic, crushed
1 tin chopped tomatoes
1 tsp lemon juice
75g ground almonds
1 medium egg
150g dried spaghetti

Method:

Pre-heat the oven to 200ºC Put the lentils in a medium pan and pour over the stock. Bring to the boil, then reduce to a simmer and cook for approximately 20 minutes or until lentils are soft. Meanwhile, prepare the tomato sauce. Put the olive oil, red pepper flakes, salt and garlic in a pan and gently heat until the aromas are released - don't let the garlic brown. At this point, add the tomatoes, and bring to a gentle simmer. Crush any larger pieces of tomato between the side of the pan and the stirring spoon. Take off the heat and add the lemon juice. Pour the sauce into an oven-proof bowl and set to one side. Once your lentils have finished cooking, drain them, put them in a bowl and rougroughly mash them. Add the ground almonds and the egg, and mix well. Once everything is well combined, use a soup spoon to help form the lentil mixture into medium-sized balls, and place the balls into the tomato sauce. Drizzle with a glug of olive oil. Bake the whole thing in the oven for 20 minutes. After 10 minutes, put the spaghetti into a large pan of boiling water and cook until tender (about 10 minutes). Serve the lentil balls and tomato sauce on top of the spaghetti for a tasty, filling dinner.

To serve, Jules suggests sprinkling with parmesan, which I forgot to do, but that would definitely be really tasty!


Sunday, 3 November 2013

Mushroom Risotto


I think I need to improve on my food photography skills.....this mushroom risotto is mouth-wateringly good but I don't think it comes across in the photos. You'll just have to take my word for it for now, and any tips on the photography front will be gratefully received!

Many people think that making a risotto from scratch is really difficult and/or time consuming. But it is one of my go-to meals, partly as it is so easy to make it seem fresh every time by altering the ingredients, but partly as I feel so comfortable making it. Yes, you need to spend a good half hour standing over it, stirring frequently, but other than that, there's not much else required in terms of time. And it is not as complicated as you'd think. I think the trick is to keep tasting the rice as you near the end of the cooking time, until you are satisfied with the consistency - not too hard, not too mushy. You will eventually develop a feel for how long your risotto takes.

Another tip I would offer would be this: don't worry too much about how much stock you need. If you taste the rice and it seems done but you haven't used all your stock, that's fine. (I suggest preparing a litre in the recipe below, but the other night I found I only used 700ml.) Or, if it's not quite done and you've run out of stock, simply add a little boiling water instead of the stock. Bearing this in mind may help you if you have a fear of trying to make risotto.


I have been making mushroom risotto for years, but had taken a bit of a break from it for the last few months, favouring pea and mint (ever since I started growing my own mint, I have loved any excuse to use it in my cooking!) or pea and carrot versions. But now the weather's getting colder and I was looking to revisit some old favourites, the mushroom risotto came back onto the menu, and it has been a welcome return!

I am usually not very specific about quantities with this recipe - I use lots of mushrooms, as I absolutely adore them, but you can reduce the amount if you want/need to. Also, I just add as much cheese and butter at the end as I feel like (sometimes this is dictated by how much of each I have left!!), but I tried to weigh out what I was using the other night to give me an idea of what to suggest you add - these are the weights I have noted in the recipe below.

If you don't have wine, it is possible to make the recipe without it, or to substitute lemon juice (both of which I used to do), but the wine really adds the 'wow' factor to this one, so I'd highly recommend its inclusion if possible. One thing I've learned over the past couple of years is that although white wine can't be drunk after more than two or three days open in the fridge, it is still fine to use in cooking after this time. I usually have an open bottle of 'old' wine in the fridge specifically for cooking, and a couple of times I have used wine as old as two months old in my risotto - and it was still delicious and caused no problems. This makes it even easier to include wine in your risotto - there's no desperation to use up the rest of the bottle! Alternatively, you can buy those mini bottles of wine, or even small cartons of wine for a pound or two at the supermarket - ideal for cooking with.

Mushroom Risotto 

(serves two with a little left over for lunch the next day!)

Ingredients:

3 tbsps olive oil
1 medium onion, chopped finely
300g button mushrooms
2 cloves of garlic, crushed
200g arborio rice
150ml white wine
1 litre vegetable stock
30g butter
50g grated parmesan/vegetarian equivalent
salt and pepper, to taste

Method:

Heat the oil in a large pan over medium-high heat. Add the onion and mushrooms and fry, stirring gently until the mushrooms have softened (approximately 10 minutes). Add the garlic and fry for another minute. Now add the rice, stirring to coat each grain in the oil. Once all the grains are coated, add the wine. Stir until the wine has been fully absorbed by the rice. Now add the stock, gradually (many recipes suggest a ladleful at a time; I am not so precise, but would say about 150ml-200ml at a time). After you have added a ladleful/approximately 200ml, keep stirring until the stock has been fully absorbed by the rice. Only at this point add the next ladleful/200ml portion. At this point, it may be good to turn the heat down a touch, if the risotto seems to be boiling rather than simmering. Continue like this until the rice is cooked through - it should still retain a little bite (it should definitely not be soggy!) but it should not be so firm that it's crunchy either. I never normally time this, but I did the other night and it took approximately 20 minutes to reach this stage. At this point, take the risotto off the heat and add the butter, cheese and salt and pepper. Stir well to combine. Let stand for a couple of minutes, and then serve. If you have some fresh basil leaves, they make a nice garnish.


I hope you enjoy this recipe and that if you have previously been put off trying to cook risotto, that I have inspired you to try!

Friday, 11 October 2013

Spicy Broccoli Pasta

Spicy Broccoli Pasta

Having no idea what I was going to eat for dinner, not very much in the fridge, and no desire to go back out into the cold (it has got freezing over the last few days!), I seem to have come up with a real winner of a dinner, just by chance. Inspired by a Yottam Ottolenghi creation (I must recommend his book, Plenty, again - I was drooling just reading it), I created this Spicy Broccoli Pasta.

It is unusual, delicious, and best of all, easy! I would definitely pay good money for this in a restaurant, and I am looking forward to cooking it for guests sometime, to see their reactions. I had never tried the combination of broccoli and mint, but it was really lovely. I think it's the combination of the fiery spices and refreshing mint that makes this dish so surprisingly good. But I will leave it up to you to try it out and let me know what you think of it.

Spicy Broccoli Pasta (serves 2)

Ingredients:

100g butter
2 tbsp olive oil
1 medium onion, finely sliced
300g broccoli, chopped into florets
200g rigatoni
1/2 tsp ginger
1/2 tsp hot smoked paprika
1/2 tsp coriander
1/2 tsp chilli powder
1/2 tsp cayenne pepper
1/2 tsp turmeric
1/2 tsp cinnamon 
1/2 tsp salt
black pepper, to taste
handful of fresh mint, finely chopped

Method:

Heat the butter and oil in a saucepan over a medium heat and add the onion. Cook gently for 10 - 15 minutes or until the onion is soft. Meanwhile, put the broccoli into a steaming basket over a pan of boiling water and cook for 10 - 15 minutes. Cook the pasta in boiling water according to packet instructions. When your onions are nicely softened, add the spices, salt and pepper, and stir well. Take off the heat. Add the pasta and broccoli to the sauce, and stir. Serve on plates, sprinkled with chopped mint.

Tuesday, 10 September 2013

Brilliant Banana Bread

a.k.a. "When Kitchen Experimentation Goes Right"


Today, I decided to try and bake a banana loaf for the first time ever. I have tried a few different people's banana bread recently - with chocolate chips and without - and every single bite I have taken of every single different type of banana loaf, I have thought to myself 'I must try to make this one day'. So today was that day.

Having heard that banana bread is quite a forgiving type of cake, in that you can't really mess it up by putting in too much or too little of a certain ingredient, I decided to do without a recipe (I didn't see any that I liked 100%) and just have a go myself. And the results were completely delicious! So sweet, and moist, and banana-y, with a crisp sugar topping - everything I wanted my banana bread to be (and everything David wanted it to be too!).


I had always thought that the bananas used for a banana loaf had to be old, with blackened skin, but as you can see from this picture, I only had one old banana - the others were pretty normal bananas that I would usually eat as they are. And the loaf tasted great. So I think that really, while you can use older bananas for this recipe, it's not actually necessary. 


Also, I used a bar of chocolate and chopped it into chunks rather than buying a packet of chocolate chips - it's cheaper and also lets you dictate the size of the chunks (I think randomly-sized chocolate chips are the true sign of a home-baked cake!).


So I'm going to share my recipe with you. The only thing I would maybe do differently next time is add some bicarbonate of soda to make it rise more. I used self-raising flour (one of the things I didn't like about some of the recipes I saw was the amount of different raising agents in them - surely it shouldn't be that difficult?) and it was fine, but if you wanted your loaf to rise a bit more, then it seems that added raising agents might just be necessary.

This is how I did it:

Ingredients:
125g caster sugar (actually I used granulated, but I know you're supposed to use caster sugar in baking, so....)
125g butter, melted (plus extra to grease tin)
1 tsp vanilla extract
1 medium egg, beaten
3 medium bananas, roughly mashed
100g milk chocolate (chopped roughly into chunks)
190g self-raising flour
1 tbsp light brown soft sugar

Method:
Pre-heat oven to 170ºC. Grease and line a 10x20cm loaf tin.
Mix the caster sugar, melted butter and vanilla extract together. Add the beaten egg , banana and chocolate chunks and mix well. Sieve in the flour, mixing well as you go.
Pour the mixture into the loaf tin and sprinkle the brown sugar evenly over the top. Bake in the pre-heated oven for one hour, or until a skewer comes out almost clean. Leave to cool, then cool further on a wire rack.


This recipe has gone down so well, we can hardly stop ourselves from going back for "just one more slice". I want to make this loaf every day now, it's that good (and easy!), but something tells me we'd both end up the size of houses if we were to have daily access to banana bread that good! If you're looking for a winner to take into a bake sale at work, or simply to impress your friends when they pop in for a coffee, this one will fit the bill, no doubt about it.


Monday, 2 September 2013

Back to Basics 1: Eggs


I love eggs. Apparently, this was not always the case (just ask my mum for the story of my first taste of egg - I don't want to spoil your appetites, so won't repeat it here). I spent a while a few months back perfecting my egg poaching technique (or at least, trying to) and I love reverting back to childhood memories and having soft-boiled eggs and 'soldiers' made of toast to dunk into the gooey yolk. Delicious! And what would a vegetarian English (or Scottish) breakfast be without a nice fried egg (if someone gives you a choice, it has to be fried - this is a fry-up, after all!).

My only rule with eggs is that they must be free-range. Why? Well, I may not be vegan, but part of the reason I am vegetarian is I am concerned about animal welfare. Buying free-range eggs is a very easy way for anyone to support kinder farming methods. Even though I love a bargain and will always look for ways to save money at the supermarket, I would never ever consider downgrading to battery or barn eggs - I just couldn't bear the thought of those hens cooped up in cages, or in dark barns, just to provide cheaper eggs for me. Of course, people also argue that free-range eggs taste better, but since I have been eating free-range for as long as I can remember (my mum is of the same school of thought as I am on this one), I couldn't honestly say I know if there is a difference in taste.

Ready to be made into egg mayo
It can be difficult to know if everything I eat that contains eggs contains free-range eggs specifically - so my rule is this: if I have a choice, and am aware of a free-range option, I will always take that option. If I am buying cakes at a charity bake sale, for example, or the pasta I am buying does not specify what type of eggs are used in its production, then I don't have access to the necessary information, and I just have to hope that I am eating free-range. That may not be enough for some people, but for me, it works.


Egg mayo!
Anyway, away from the ethical debate, and back to the topic at hand: actually cooking eggs! Now, I know this may seem pretty simple, but I have had a couple of readers tell me that they love reading my blog, but have a fear of the kitchen. For those readers (and anyone else who feels like that), I want to take things back to basics. Now, I haven't thought far enough ahead to have worked out what else I can take this approach with (even as a student, I could never write an essay plan to the end, so what made me think I'd be any better at forward-planning for my blog?!), but for now, I would like to say that this is supposed to be the first of several (or at least, a few!) posts that will take you back to the basics of cooking vegetarian food. Today is all about the humble egg (in case you hadn't already guessed).

How to Keep Eggs

Firstly, storage. I know that most people keep eggs in their fridge. In that special little egg-holder thing that sits in the door - that's where they go, right? Well, no, not necessarily. Eggs cook best from room temperature, so why would you want to chill them, only to have to bring them back to room temperature to actually use them? Think about it: where are the eggs stored at the supermarket? Not in the refrigerated section, are they? No, they are stored on the shelves, at room temperature. So I store them in the cupboard at home - that way, they are always at room temperature, ready to be used, and also, some much-needed extra room is freed up in the fridge. Win-win!

Secondly, forget the use-by date. There is no need for use-by dates on eggs. I know some people are really funny about adhering to these stamped-on dates, and worry about salmonella if they use their eggs after this date has passed, but really, there's no need. There is a simple test you can do to determine whether or not an egg is still good. Fill a jug with water, carefully place the egg into this, and see whether the egg sinks or floats. If it sinks, it's good to cook. If it floats, that means it's too full of air and has gone bad. Bin it. (A really fresh egg will completely sink, lying on its side on the bottom of the jug. Eggs that sink to the bottom but then 'balance' on one end, appearing to stand up [but still touching the bottom of the jug], are still fine to cook with, but just not quite as fresh as the ones that completely sink. I regularly cook with these 'balancing' eggs, and they are always delicious.) Reading back over that, it does sound suspiciously like the old 'witch test' you learned about in school history lessons, but I can assure you, this test actually works (and no innocent women are killed as a result)!

The 'sink or float' test

Peeling Boiled Eggs

Speaking of eggs that aren't quite as fresh, if you are hard-boiling your eggs and wanting to peel them afterwards, you probably want to cook with an egg that is not perfectly fresh, as it makes the peeling much easier. Ah, the peeling! So if you have got as far as this stage, it probably means that you have boiled your egg successfully. I will come back to how to do that in a minute, don't worry! But as far as peeling goes, this is how I do it. Once you have cooled your egg in a bowl of cold water (with ice cubes if you want to speed up the process a bit), simply tap each end of the egg on a hard surface to crack, then, putting the egg back into the bowl of water, roll the egg on its side, right the way round, so that eventually it has cracks all the way round its shell. The picture on the left, below shows how it should look. Now, starting at the top, where it should be easiest to find a piece to peel away, simply peel the whole shell off. The older the egg, the more easily it will come away (take a look at the other two pictures below - these were older eggs, and look at how the shell is peeling away so well), but even with fresher eggs, I find this to be the easiest method of all that I've tried.


How to Boil an Egg

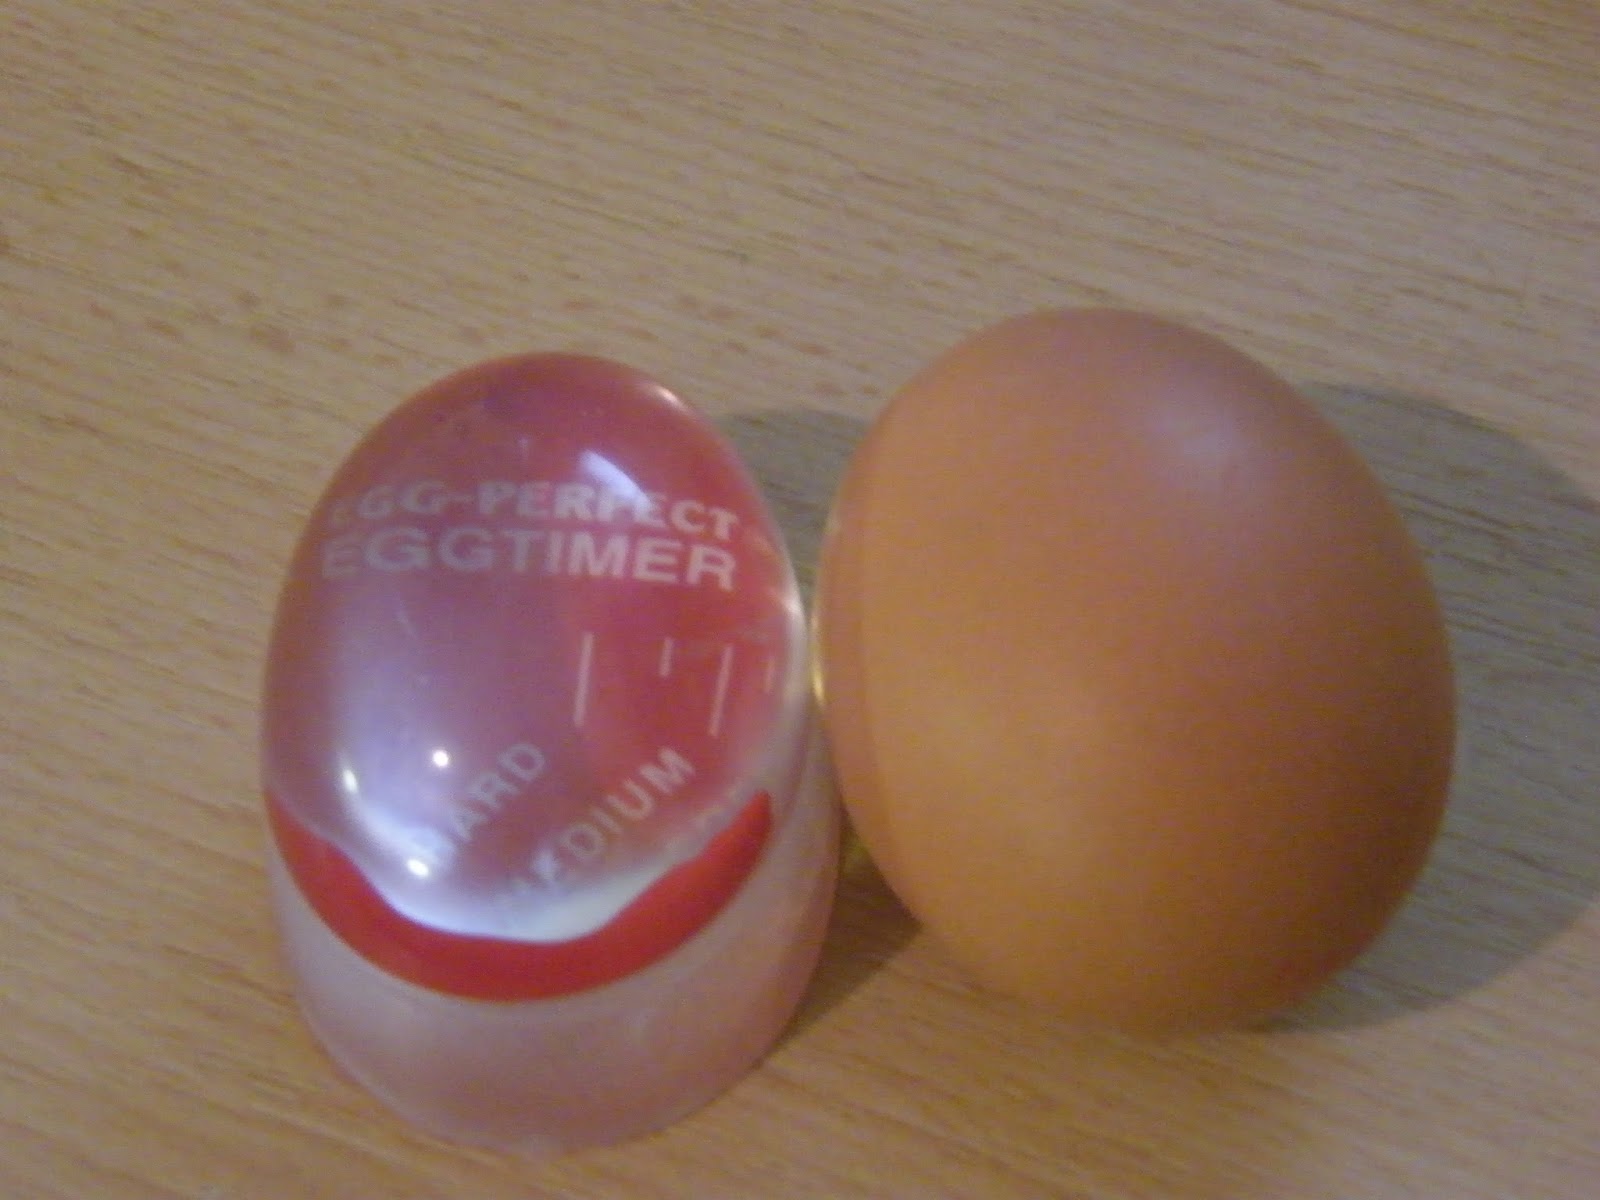
Now, how to boil that egg. For the complete beginner, I cannot recommend highly enough the little in-the-water egg timers you can buy very cheaply (I've seen them online, in pound shops, and in more expensive kitchenware stores). Now I know that there are some concerns about how safe these are, with fears that chemicals from the plastic may leak into the water and find their way into the eggs. But I have to say, I wouldn't have thought they could pass all the safety tests and be on the shop shelves if there were really any danger. So I choose to ignore all of that, and focus instead on how easy they make the process of boiling an egg! Simply place your egg(s) (the timer works equally well for a single egg as it does for multiple eggs) in a small pan of cold water with the timer (the water should cover the eggs well), bring to the boil, and keep an eye on the timer. This timer does not ring when the time is up! In fact, 'timer' is probably the wrong name for it altogether, as it does not time the eggs, rather measures the water temperature. All you need to do is decide whether you want your egg soft, hard or medium-done, and take the egg(s) out of the water when the colour changes up to the line that corresponds to how you want your egg done. Simple! 


Clever egg 'timer' 
In the pan, ready to go


If you don't have one of these 'timers', I would suggest buying one right now! But if for whatever reason you can't, or have problems with the possibility of chemical release in the water, I would point you in the direction of Delia Smith, who explains very well two methods of boiling eggs successfully without this type of timer.

Now, if you have hard-boiled and peeled your eggs, why not half them and add them to a nice salad (a good way to add some protein), or chop them roughly and smother with mayonnaise (free-range, of course!) and some freshly-ground black pepper for a delicious egg mayonnaise sandwich filler. I plumped for the egg mayo option for my lunch - perfect! When you see how easy it is to make your own, why would you ever buy egg mayonnaise from a shop again?

Let me know if you have tried the egg 'timer' I mention above - are you as big a fan as I am?


Egg mayo and lettuce wrap

Thursday, 22 August 2013

More Ottolenghi - Marinated Buffalo Mozzarella and Tomato

Yesterday I wrote a bit about how fussy Yotam Ottolenghi can seem when writing about his recipes in his book, Plenty. So fussy that it would almost put me off trying some of his recipes, actually. But I decided to give myself a challenge and see if I could do his Marinated Buffalo Mozzarella and Tomato any justice using bog-standard, supermarket-bought ingredients. After all, I figure that this is what most people will end up using. I actually went one step further and bought the cheapest mozzarella I could find, just to be bad! (Um, ok, and to save money...) So I tried this recipe using Tesco Everyday Value mozzarella and Tesco 'juicy cherry tomatoes' (that's what the box said they were!). All other ingredients were for the marinade, and I had all of these on hand, with two exceptions. I had no lemon to get lemon zest, so instead I opted for a splash of lemon juice from a bottle (shock! Horror!), and I didn't have any fresh oregano, so I used dried instead (remember to always reduce the quantity if you're using dried herbs as an alternative to fresh, as the flavours are intensified).

Now, I have to give top marks to Mr Ottolenghi on the simplicity of this recipe. It really is extremely easy to prepare and takes hardly any time (if you don't count the 15-30 minutes' time that the mozzarella is to sit in the marinade - which I don't). I'll give you a quick run-down of how I made this, so you can get an idea of just how easy-peasy it really is.

My makeshift mortar and pestle!
The first step is to dry-fry 1/2 a teaspoon of fennel seeds until they pop - at this point, transfer to a mortar and pestle and crush the seeds. I don't have a mortar and pestle (hint hint, if anyone wants to buy me a present!), so I just crushed the seeds with a teaspoon in a ramekin (but any small bowl could be used), and this worked very well. Tip into a small bowl (if you have crushed the seeds in a bowl rather than a mortar and pestle, then obviously just keep them in that bowl, and congratulate yourself on saving on a bit of washing up) and add the following ingredients: grated zest of one lemon (or a splash of lemon juice), 15 finely chopped basil leaves, 2 teaspoons of chopped oregano (or 1 teaspoon of dried), 2 teaspoons of extra virgin olive oil, 2 teaspoons of rapeseed oil, 1 garlic clove (crushed), 1/2 a teaspoon of sea salt, and black pepper. This is your marinade.

The marinade
Ottolenghi suggests ripping the mozzarella (250g) into chunks and then smearing these with your marinade. But to me, it makes a lot more sense to just add the mozzarella chunks straight into the bowl and mix it up a bit to ensure all the mozzarella is covered by the marinade. That way, no marinade is wasted and also it's a less messy process. Win-win!

You then let the mozzarella sit in the marinade for 15 to 30 minutes, then chop your tomatoes into wedges and serve together with the mozzarella. The recipe suggests drizzling with extra olive oil, but I didn't do this, partly because I was so excited to try out the salad that I forgot (oops) and partly because I don't really feel it needs any extra oil.

Mozzarella in the marinade
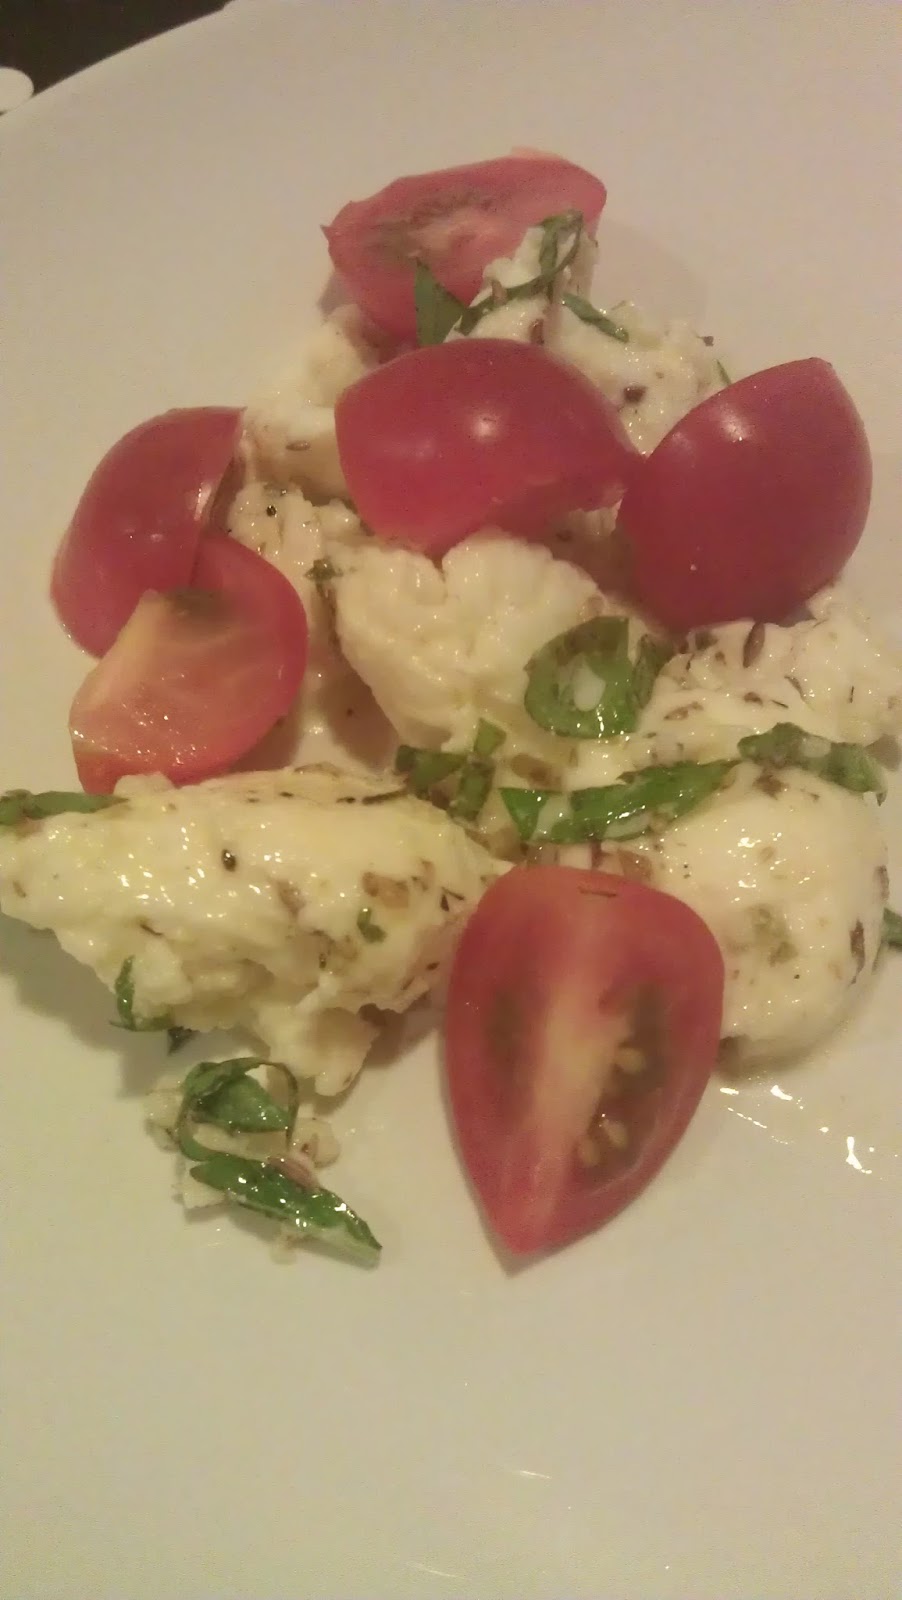
So what was the verdict? I really enjoyed this. I had originally intended to taste some tonight so I could blog about it and take the rest into work for my lunch tomorrow, but it was so good that I gobbled it all up!  (I hasten to add at this point that I had only made a half portion, so although I am greedy, I'm not as greedy as it may have just sounded.) The fennel really shines through and gives the dish an unusual taste, and it looks beautiful, with all the ripped up basil (and I'm sure if you had fresh oregano it would only look even better).

The finished product - delicious!
But what about the 'poor' quality of my ingredients, I hear you cry! Well, I have to say, that with the mozzarella the star of this dish, I might buy slightly better quality cheese next time. But it would all depend on the occasion. If it were just to be a lunchbox filler, I'm quite happy with the cheap mozzarella - it tasted nice enough to me. But if I were serving it to guests, I'd probably prefer to know I was serving slightly higher quality fare. And the tomatoes? Actually, I really enjoyed my straight-from-the-fridge tomatoes in this salad! Yes, I'm sure it would be absolutely delicious with a lovingly homegrown fruit instead, but honestly, I wouldn't waste any time or money searching for the perfect tomato for this recipe. Go with a type of tomato that you enjoy, and you'll be fine. I am not a huge fan of regular-sized tomatoes, so tend to substitute the sweeter cherry tomatoes in a lot of dishes that call for ordinary tomatoes. So doing the same here worked just fine.

Marinated mozzarella and tomato 
I am hoping that perhaps I can get some tomatoes growing in my wee patch of garden next year, so perhaps at that point I will try this recipe with home-grown tomatoes instead and see what I think, but I can't imagine it making that much of a difference. What do you think? How important is the quality of ingredients to you? And does anyone grow tomatoes (or anything else that could grow well in a pot in the harsh Scottish climate) that could give me some tips? (I'm not the most green-fingered, but I am enthusiastic and hope I will learn quickly!)